Wednesday, June 23, 2010

Easy, fast, cheap and guaranteed to entertain

Okay... I saw this somewhere, at some point, but have no memory where.  My disclaimer.  Yeah, my brain is a sieve. 

At least I remembered this activity book and hopefully some of you will throw one together and reap the same rewards that I have.

Okay.  This could NOT be easier.

Step #1:

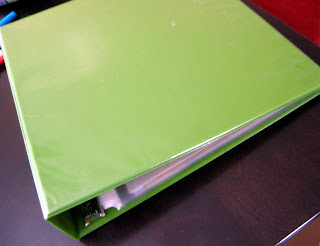
Get 3-ring binder.  Old, new, used... whatever.


Step #2:  Buy/find plastic binder sleeves.


Step #3:  Find/buy dry erase markers.


Step #4:  Gather some blank paper, colouring books, activity books, photos, etc. and fill the binders sleeves.

Step #5:  Let your favourite artist/puzzler-solver loose on the new activity book.


Step #6:  Once the fun is done, wipe the whole book down with a cloth or wipe and it's fresh and ready for the next time!


Is that the easiest and the best?!  Imagine the possibilities... I'm thinking photos of family faces where the artist can add mustaches, eyebrows, etc.  Or what about sudoku (or other math related games), practising letters,  tic tac toe... It's endless.

Now, a quick word about dry erase markers.  Don't really know what they're made up of, but I know they are not 'washable' in the crayola-sense... and not specifically made for kids.  So, use your judgement.  If the marker is likely to end up in the artist's mouth, save this for a few years. 

Great travel tool for the older kids.

Enjoy!

Monday, May 31, 2010

Mama's got a brand new (felt) bag

In between selling our current house, buying our future house and planning Mr Canuck's 36 day work trip, the crafting-life has fallen by the wayside.

Egged on by my caregivers request for a donated item for a charity auction I started to seek inspiration.  It didn't take long to find this picture circulating on the ol' crafty sites:


I knew as soon as I saw this picture from the cover of this beautiful looking new book, that I was going to use this bag as my inspiration.

I haven't worked with felt before, but it's such an appealing product that I thought I'd go for it.  Plus, I've recently found a bunch of different coloured felts at the thrift store.  (Fun and cheap!! woowoo!)

Now, many sites, like Craft, are featuring write-ups of this book and a link to a free pattern for this bag.  I'm all about the free patterns, but I have no patience.  So, I took a look at it and then 'drafted' my own onto the back of a discarded Shreddies box.  Yeah... I'm classy like that.

I'm sure it's not really too far off from the measurements of actual pattern, but I couldn't say for sure.  And guessing at that bottom piece was a fun experiment.  (My point?:  Just print out the darn pattern).

Anyhoo... so taking this image and blending in my head with those cute Swedish painted, wooden horses:


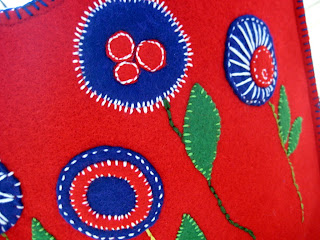
...I came up with this:


It's all hand-done except where I reinforced the double-layer of felt.  (I used Heat'n Bond to adhere the two layers together, but it isn't so great with felt... the extra stitches just backed it up).

I taught myself the blanket stitch for this with a great little video on youtube.  What a world we live in!  Can you imagine ol' Laura Ingalls searching youtube for a tute on handstitching.  Hi-larious.

My husband wonders at my sanity to spend so much time on a project headed for an auction, but as I always tell him "it's the process, not the product".  So off it goes, assuming she likes it and wants to add it to the benefit.

That's all from here.  I'm seriously starting another one of these bags right away.  I think they are too fun and I have a feeling that a certain sister of mine will love it's wonky charm.  Right?

Wednesday, April 21, 2010

Happy Mother's Day... early

My mom and dad spend half the year on the east coast, so I don't get to see them during the summer months.  (Unless I visit, which I hope to!)

Their departure is in the next couple of weeks, so I thought I would make my mom a Mother's Day present now to send along.

She recently made me a scrapbook of all sorts of items from my youth... report cards, letters and drawings.  Some of them are so funny, especially this one:
Crazed Mom!

I drew this for her in around 1977, just about the time she was cranking out babies and generally living a chaos-filled life.  I think I captured the era quite well in that expression.

I've seen crafts where people take their children's art and re-create it into something more permanent, like a doll or a transfer.

I thought I would make my mom a shopping/beach/all-purpose bag that had her image (as seen by a 3 or 4 year old) emblazoned on the front.


My method for transferring images is to trace them from my computer screen onto Glad Press'n Seal, and then adhere the wrap to the fabric I'm stitching.  It sticks really well onto the fabric and then you just tear it out after you're done stitching.

Here is a shot of a hand anatomy tracing I did from an old textbook onto the Press'n Seal:

It's a great option for those of us who aren't the best free-hand drawers.  Just don't steal someone's creative property.  Just had to say it...

Here's a dinosaur skeleton I did using this method:

It's not an advert for Glad...it's just the only product I know that does this. 

My original idea for this came from Urka on the Craftster site.  Click here to see the hilarious onesies she made using the technique.


Anyway... back to the bag!


Detail of the stitched pocket


My first satin stitch attempt.


All lined and ready to go...


...with a handy snap on the pocket!


I didn't use a tutorial for the bag... I've made enough of them now... but if you're looking for a good one, check the Morsbag site.

And Ma?  If you see this, Happy early Mother's Day... you get it on the weekend.  xo

Tuesday, March 23, 2010

'Tis the time for eggs

With Easter right around the corner, I thought this was a good time to talk about pysanky.  Pysanky, which I think translates to something like 'eggs with writing on them', is the traditional Ukrainian egg decorating method.

I haven't managed to partake in this craft for a few years, but I have kept my little egg babies from before children.  Believe me, once you invest this much time in an egg, you hold on to them!  I'm afraid you will have to be very organized and very motivated to take up pysanky when you have little ones running around the house.

I won't go into the details of the 'how-to's' of this amazing craft, because it's been well covered on the internet by people wiser than me.  (Here's a good link if you're curious.)  In my experience of teaching others the art of pysanky, it seems that people fall into one of two categories:  Those that get it, and those that don't.  I'll explain.

Pysanky is basically drawing on the egg with melted wax.  It's almost the exact same technique as batik, but on a different medium.  So you start with a naked egg and apply wax to everywhere you want the egg to stay white. (Assuming, of course, you're using a white egg).  Then you dye it your first colour... say, yellow.  Then you apply wax to everywhere you want the design to stay yellow.  Then you dye it again.  And so on.

It's not really complicated, but it is a long process.  My experience is that some people have a very hard time with the 'negative' view (meaning, covering the parts you want to stay a certain colour).  Or call it the 'backwards' design.  I can't really explain it, but some brains can't seem to do the design backwards.  Hey! If that's you, don't sweat it.  It's just eggs after all!

My approach over the years has been to explore traditional designs, but also look at other inspirations.  Quilting, which I also love, is a great design resource for decorating eggs.  This book is my absolute favourite for stretching the boundaries of egg-design.  (My husband would call me a mega-nerd for just writing that sentence... that's me, Ol' Egg-Head Mc Nerderton).

So, on with the eggs!

Here are a few of my favourites:


There is a definite need for a 'zen' philosophy when you work on something as fragile as a real egg.  They can smash at any point!  I've been 99% done a design and have it crack, or drop it, etc.  There is something meditative about the process, but it's also a little hard on the back.  Just try and do pysanky without getting a stiff neck!

I always liked finding the smallest sized eggs, because they just look so darn cute when they're done.  Brown eggs are a nice route to go too.  I always blow out the contents after they're done so that the shells aren't full of dye.  There's lots of options, including leaving the contents in, but I was never that brave.  I always imagined them breaking at the stinkiest point and living with rotten egg smell forever!

Good luck to all who give it a go!  Happy decorating.
Saturday, March 20, 2010

Car Caddy for a 3 year old

My nephew turns 3 next week, so I made him a traveling car caddy for his birthday.  I can't take any credit... it's completely based on the great tutorial by Jill at homemade by jill.

It turned out great and my eldest and I went out and bought the cars for it.  Filled up and ready to go!  How perfect is that for a vehicle obsessed boy?!

All rolled up and ready for delivery.

It took about 2 hours to make once I had my things together.  Pretty quick and easy.

Now I'll have to adapt it to fit trains for my boys!


Tuesday, March 2, 2010

Wow!

What a crazy week.  I can't BE-lieve my pompom flowers were featured on Apartment Therapy!!!  Like, are you kidding me?!?  This blog usually get about, oh, 5 visits a week and, let's just say there were many more this week.

So, first off, let me give some late credit to Domestifluff.  While I used Poopscape Projects tutorial to make my flowers, I'm sure I must have seen Domestifluff's flowers at some point too.  Late cred, but better than ever.
The Model and the Flower

I've been busy with other things too.  I made some homemade playdough for the boy-o's to play with.  It's nice to make your own.  If they eat it, it won't hurt them (but, mega-ewwwwwwwwwwwww).  And you can just sweep up the crumbs and throw them in the greenbox.

It's pretty easy to make.  Just use 2 flours, 2 waters and 1 salt.  So, to make a big batch, use:

2 Cups flour
2 Cups water
1 Cup salt

Throw in a few tablespoons of vegetable oil and a tablespoon of cream of tartar (for stretchy-ness).

Throw it all in a pot and stir it on warm until it pulls away from the sides.  Take it out, let it cool and then knead it 'til smooth. 

At this point I add some food colouring to some of the chunks. 

Then, I unleash the monsters and let them at it.


Oh, and I made this (slightly lame) train cake for my boys on their birthday.  Oodles of sugar, candy and icing.  Disgusting for grownups, heaven for pre-schoolers.


Currently I'm working on a triangle quilt.  I find triangles super-tricky, so I'm trying a new technique.  We'll see if it looks less wonky than my previous efforts.

Check out this inspiration from Film in the Fridge:

Awesome!


Loving this from Journey into Unschooling:


Oh Dreamy!  Oh Fransson! (click to see her great stuff).


That's all from here.  Thanks to all who visited from Apartment Therapy.  Nice to have you!

Tuesday, February 23, 2010

Flowers for February

I made some yarn and twig dandelions, from inspiration here.  They are so quick and easy and quite chipper on a snowy February day!

See the link above for really great instructions. It's a good think I don't have any other colours of wool here, because I might get carried away...

Wednesday, January 20, 2010

Grey world

January in Ottawa is cold, dark and grey.  I need to infuse some colour into my crafting.

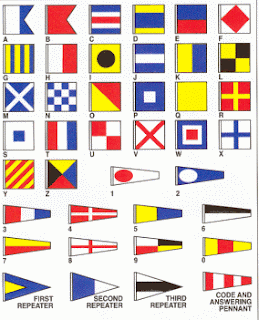
Here's my inspiration for this week:


I'm using these nautical flags as a start point to a new project.  They are so chipper and bright.  I think there's a fun project to be done with spelling out words with them.

Updates to come.

Saturday, January 16, 2010

Oooh, broken promises!


A little pillow case I made for my sister, because she likes the Santorini fabric


Remember at the end of the last post when I promised 'more posting, more often'?  Well, that was clearly not the truth.

So, here I am. 

Let's see... in crafting news, I received a new Pfaff sewing machine from my husband!  It's pretty awesome and about 7000% better than what I was sewing on before.  Pfaffy and I just have to make friends and figure each other out and then I'm sure I'll get rocking on that.

As a practice run on the new machine I made some cloth napkins.  I think they are a great thing to make because they are environmentally friendly, take virtually no time  take virtually no fabric and, once mastered, will make a great house-warming present, etc. (Not to mention, a possible craft business item!)

Don't have the photos taken yet.  Spent the bulk of the week alone as hubby was traveling for work, so I'm afraid that crafting is always the first thing to go during busy times.  Sad, but true.

Will post a cloth napkin mini-tute when I get rolling again.

Here are a few things that have been inspiring me these days:

Vintage Cateye glasses onesie, by Ashley Ann

Craftzine's Top 100 craft tutorials of 2009

Make it and Love it's Gathered Flannel Scarf Tutorial

Oh!  The inspiration is not missing, that's for sure.  Just time.  Always time.

Friday, January 1, 2010

Holi-delay

Forgive the absense of new stuff, but I've been so busy with the holidays, the move across the continent, the travel to see family, etc, that I haven't had much posting time.

That being said, I'm super-excited about getting settled and fully unpacked and getting to work on some new crafty projects.  My goal for 2010 is to make some money from crafting.  I'm really curious about the process and to find out how hard it will be to make a go at it.

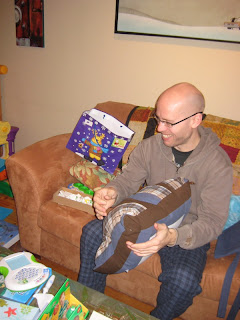
If my friend Phil's reaction to his crafted gift is anything to go on, I would make a mint.  I think he's a special audience though.  I had very high expectations of his reaction, and was not disappointed.  Take a look:


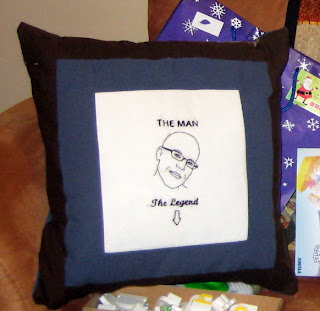
Phil was house-sitting for us while we were away and so we got to spend the last 2 weeks 'over-lapping' as he waited to get into his new place.  Having him here for Christmas morning was a great gift and the boys loved having him.  His move out starts today and job #1 is to get the "Phillow" over safely.


It was my first embroidery project ever, and I couldn't have laughed more.

Happy New Year to everyone.  I'll be posting much more often now, so watch for my new stuff.